
A Japanese sword is made of the peculiar material called the "Ta-ma-Ha-ga-ne (Japanese steel)". Ta-ma-Ha-ga-ne is produced in the smelter combining iron from iron sand and carbon from charcoal.
There are many steps to make a sword.
1. Preparation for the material
1) He-shi-process (Re-melting for carbon percent control, Hardening and Platening)
The production of the sword begins from the manufacture of the base steel called the He-shi-process.
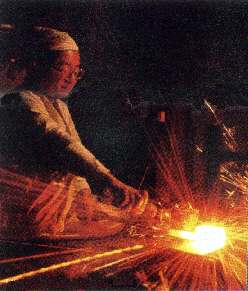
The lump of Ta-ma-Ha-ga-ne is heated, and hammered into flat sheets. This is the starting point of forging.
Next, the flat pieces are hardened to obtain the heshi-metal. This heshi-metal is struck and broken in little pieces to be sorted.
- The pure iron, carbone content closed to 0, called the pig iron.
- The high carbon content, called zuku
- The Hocho-iron, higher carbon content used for the jacket of the blade. The O-ro-shi-process, re-melting process is used to adjust the carbone content of these steels and make them suitable for the next process steps.
2) Tsu-mi-wa-ka-shi-processing (element adjustment)
The small pieces are stacked on a tool called Teko, they are wrapped in the Japanese paper to be hold together.
Straw ashes are put on the surface and the whole is coated with clay juice.The stack is heated to such a temperature in the charcoal fire (Hodo) that clay on the surface does melt. Straw ashes and clay prevent the loss in weight of the steel due to the oxidization.
The pieces are heated and taken out from the fire floor when the suitable temperature is reached.The pieces are then strucked with small hammer blows, the piece is strengthened, and a "base", 60mm widthwise, 90mm lengthwise is created.
This process is called "Tsu-mi-Wa-ka-shi"
3) Shi-ta-ki-ta-e (Lapel forging 5-6 times)
Next, few layers of steel are piled to obtain a stack weighting about 1.8 to 2.0 kg. the Wa-ka-shi-process is repeated, the material is extended to a length of about 200mm.
With a cold chisel the material is cut, in the center, the cutting line in the direction of the material extension. The piece is folded lengthwise and the Wa-ka-shi-process is done again to weld the folded parts. Then the extending, cutting and lapeling operatons are repeated. Such lapel forging is called Shi-ta-ki-ta-e. It gets rid of extra carbon in the steel and is repeated about 5-6 times to make an homogeneous steel.
All the Ta-ma-ha-ga-ne, pig iron (zuku) and Hocho-iron are treated by the O-ro-shi-process (re-melting process) and the Shi-ta-ki-ta-e-process. Making Japanese sword requires number of pieces of the three kinds of steel.
2.Tsu-mi-wa-ka-shi, Tan-ren, A-ge-ki-ta-e
1) Tsu-mi-wa-ka-shi (making alloy)
The 4 following parts are combined to make Japanese sword.2) Ta-n-re-n (making of Body steel, Ridge steel and Edge steel)
a) Shi-n-ka-ne (Body steel)
b) Mu-ne-ka-ne (Ridge steel)
c) Ha-no-ka-ne (Edge steel)
d) Ga-wa-ka-ne (Side steel)
All metal of these parts are mixed by combination of the three kinds of metals coming from Shi-ta-ki-ta-e, Tsu-mi-wa-ka-shi and lapel forging.
The center steel will be done from 7 times lapel forging steel. The ridge steel will be done from 9 times. The edge steel will be done from 15 times lapel forging and has 32,768 layers.3) A-ge-ki-ta-e (making side steel) process
After the forging completed, edge steel, body steel and ridge steel are combined in three layers and welded by forging .
It is done by welding 4 pieces. The result is a piece of 90mm long, 20mm width and with a thickness of 40mm.
This becomes the part of the wick of the sword called "wick steel" generally.
The steel for Ga-wa-ka-ne which becomes the surface of the Japanese sword is made from Tsu-mi-wa-ka-shi, Shi-ta-ki-ta-e and will be support 12 times the lapel forging process. It is called "A-ge-ki-ta-e" especially.
3. Combine
The forged side steel is further extended in the double length of the wick steel. After it is cut in the center and the 2 parts are placed on the side of the wick steel. The side steels are sandwich-shaped around the wick steel.
4.Wa-ka-shi-No-be, Na-ka-go-Tsuke, Su-no-be, Hi-zu-ku-ri, Ka-ra-ji-me (cold forging)
1) Wa-ka-shi and No-be processes
Tsu-mi-wa-ka-shi process and welding process by forging are done for this sandwich-shaped piece. This piece is lengthen by Nobe-process to 500-600mm long with 15mm thick and 30mm width. These processes of Tsu-mi-wa-ka-shi and No-be will create a special compound material which is ready to make a Japanese sword.2) Na-ka-go-tsu-ke process
After that, the handle used for forging is separated, and the Na-ka-go which becomes the handle of the Japanese sword , it is processed by tsu-mi-wa-ka-shi and welded to the compound material.3) Su-no-be process
The length that it is linked to the weight of the material is calculated here. The piece is forged to obtain the desired dimensions and then smoothed with small hammer blows. These processes are called Su-no-be. The shape of sword is prepared; length, width and thickness are set up to correspond with the archetype of the final figure of the sword.4) Hi-zu-ku-ri process
The work of making the actual shape of the sword is done with the Hi-zu-ku-ri process. The ridge of Nakago (Tang) is forged to get a round shape, the ridge of the sword body is forged to become a triangle. Next, the edge of the sword body is forged more, and made thin. The whole shape is modified after forging with the Shi-no-gi-chi. The sword is heated to the color of the adsuki bean (a low temperature) and then the sword body is cooled down gradually.5) Ka-ra-ji-me process (cold forging)
After a sword body gets cold, the black skin of the surface is removed with the rough grindstone. Then, the cold processing of forging Hi-ra-ji and Shi-no-gi-chi with same procedure as Hi-zu-ku-ri, named as "Ka-ra-ji-me" is done. It's assumed that the cutting performance of the sword increases with this process. The ridge and the edge line are made straight before finishing the body of the sword. After that, the little roughness on the surface is shaved with the plane. The shaved iron is called Sen.
When the roughness has disappeared, the Machi (notch) between the ridge and the edge is made in the border of the sword body and Nakago. The Machi decides the end of the edge length (Ha-wa-ta-ri) of this sword and a basic sharpening of the blade is made before the quenching process. This sharpening operation is done with the rough polishing-stone to take out the shaving marks made with plane called Sen. Oil and fat on the surface of the sword body is removed with a mix of straw ashes and water, and then the surface is dried.
5. Tsu-chi-o-ki and Quenching (making the curve)
1) Tsu-chi-o-ki processing
The next process is the quenching which gives a Japanese sword a beautiful curve and toughness. Both of the intuition that it was sharpened and purified, and the very advanced technology are required in everywhere steps of this treatment. Before doing the quench process of the sword body, the "Tsu-chi-o-ki" work of applying three kinds of quench soil (clay coating) to Hi-ra-chi, Ha-mo-n and Shi-no-gi-chi is done.2) Quenching
Quench soil is applied to Hi-ra-chi of the sword body, uniformly and thinly in the beginning of the tsu-chi-o-ki. Next after, the outline line of the ripple is marked with a writing brush. Another layer of soil is applied in Shi-no-gi place to get a thicker soil for this part than for the edge. When it is done like this, a thin part of the edge is cooled more rapidly during the quenching process and quenched completely. On the other hand, the cooling speed becomes slower for the thicker soil, and the quench isn't done fully in the ridge of the sword.
The part of the edge fully quenched becomes hard and a little bit longer. On the opposite the steel of the ridge which cools slowly contracts. This property is used skillfully to obtain the curve which is peculiar the Japanese sword.
The workplace is darkened to know the heating temperature properly. The sword body which has tsu-chi-o-ki done is deeply put on the fire floor, and the whole of the sword body is heated uniformly to about 800 degrees. The sword body with an even heat is pull out from the fire floor. Then a sword body is plunged into the water tank. This is done quickly, the craftsman plunged the sword body into the water at a stretch in accordance with his breathing. In the water, the sword body begins to turn in the direction of the edge, but after short time, it warps conversely.
When the sword is fully cooled, it is pulled up from the water tank, and sharpened with the polishing stone which is rough at once, and the quench condition of edge is checked. If a quench edge is prepared as required, a sword body is reheated in the charcoal fire, and tempered. This treatment is called "A-i-do-ri". A sword body could warp during the quenching operation. Therefore, while there is remaining heat from the Ai-do-ri, it is struck on the wooden base with light hammer, and it is corrected. Moreover, the nakago is also tempered and its shape corrected.

6. Togi (polishing) - Registration
1) Togi (polishing)
After this, the whole shape of the Japanese sword and its thickness (the swell condition of the sword body) are modified by Japanese sword master as his last work before the polishing by the Japanese sword polisher. According to the order, the groove, a U letter shape which it is called as the "gutter (Toi) " is shaved with the Sen in Shi-no-gi area of the sword body. After the shape of Na-ka-go is finished with the Sen and a file, the Me-ku-gi (peg) holes are drilled and some clean line figure are engraved on the surface with the make-up file on the Nakago (tang).2) Registration
An inscription is cut with cold chisei at the last and the work of sword master is finished. Then, the Japanese sword send to the polisher and the Ha-ba-ki and the Sa-ya (sheath) are set on the Japanese sword. The Japanese sword are polished finally. After all works are completed, the Japanese sword is finished.
"Sa-ya (Sheath) " materials ; The tree of Hoh which dried well is used. The profile of the sword is copied on the surface of wood with a pencil. It is shaved with the chisel. (inside) A curve is made in the sheath in the case of the sword which doesn't have a curve. (outside ) It is sealed with the glue made from rice grain called So-ku-i. (The part of the sheath is the investigation result of Mr. Kumano of ML from the item of "Ma-ki-e" (lacquer craft) of the "Heisei craftsman picture history Kanto edition".)
A Japanese sword is delivered to the hand of the order master with the permit of possession after it has been returned to the hand of sword master and after a registration examination by the Board of Education. It is said that at least 3 to 4 months are required to complete a Japanese sword.
From the editer;
1) First editon;
This story is translated and arranged by H.Thoma from the book "Wonder encyclopedia for high technical production of many things" edited by The Japan Society for Technology of Plastcity and published by Korona Co., Ltd.
2) Latest editon(July 25,1999);
All sentences have been reviewed by Mr.Georges Emeriau. Thank you, Georges!
Back
Forward